I have been working with the DV360 Custom Bidding product since 2019. Back then, it was just a beta, but in recent days, the product has grown immensely. When I started reading about the concept of custom bidding, it was fascinating to see what a game changer this product is for the programmatic community. The ability to build your custom algorithm is a huge opportunity to create a better connection between your campaign objectives and business goals!
This will be an extensive post, so brace yourself! Depending on your level of expertise with the DV360 Custom Bidding product, you can decide which section you want to spend most time on. There is some technical documentation out there, but I have not seen anything extensive or practical. Therefore, I decided to put something (hopefully useful) together.
Summary
- What is Custom Bidding?
- How does Custom Bidding work?
- What are the main aggregate functions and script structure?
- Practical use cases and script templates (with real examples)
- How to create an algorithm and assign a script to campaign inside DV360?
- What is the best way to setup a DV360 Experiment to test your Custom Bidding algorithm?
- How to correctly measure and report on your Custom Bidding algorithm’s success?
- Work with Lachezar (Lacho)
What is Custom Bidding?
Custom Bidding is an outcome-based buying feature in DV360 that allows an advertiser to write a custom script that defines how much an impression is worth based on a specific criteria. You are probably familiar with the standard bidding strategies in DV360 (eg. “Maximize Clicks”, “Maximize Conversions” and etc.). They are preset algorithms created by Google, which are programmed to bid higher for impressions that are more likely to bring you clicks, conversions or viewable impressions.
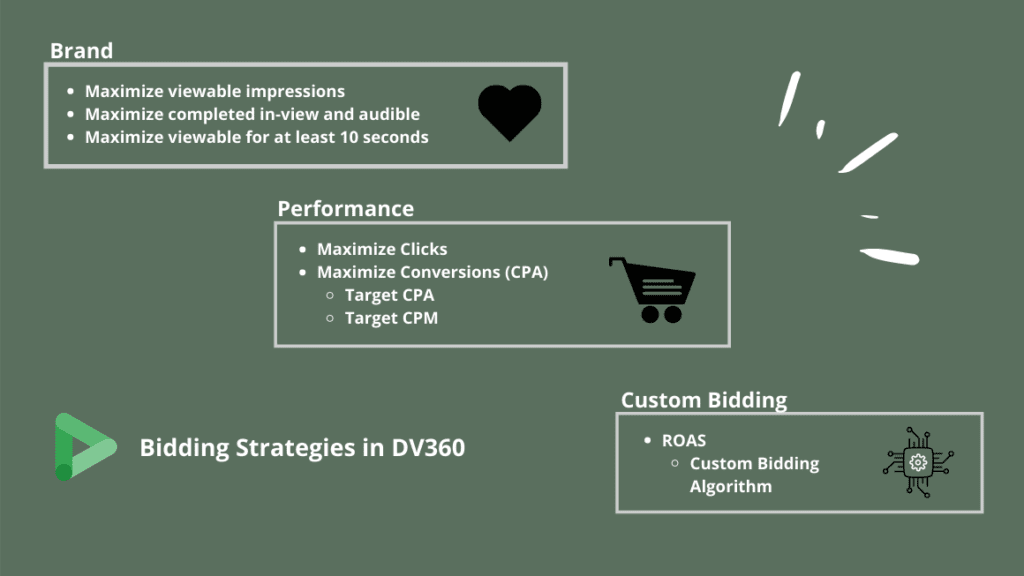
With custom bidding however, you can go beyond a single action and create a multi-layered bid. For example, you can assign different weight to each conversion in your funnel or bid differently based on a value received in a custom variable or google analytics goal. In other words, you can fine-tune and supercharge your bidding strategy to the smallest detail! Hence, achieving the highest ROAS possible and bidding closer to your actual business goal.
How does Custom Bidding work?
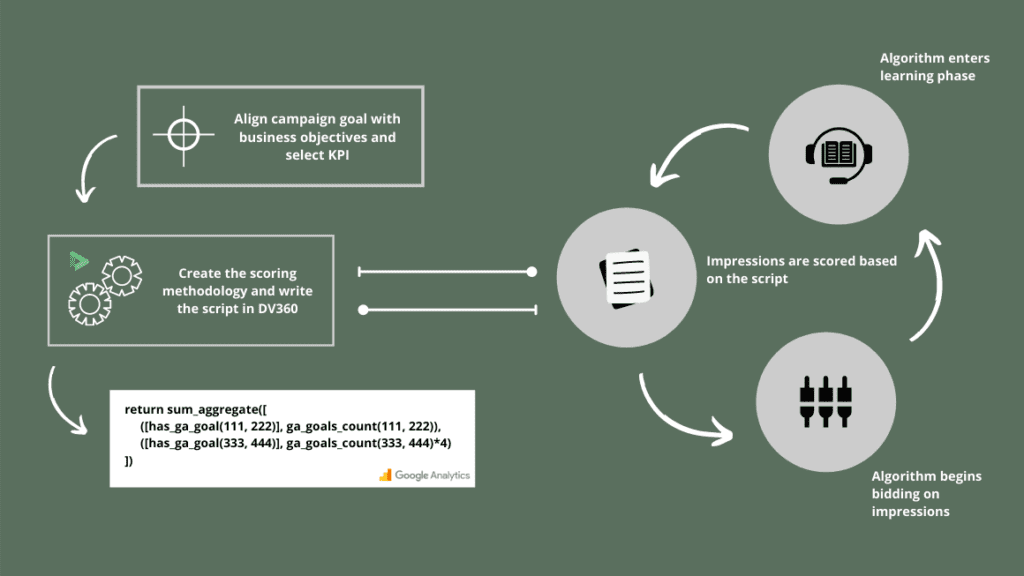
The magic behind custom bidding is a combination between your own insights about your business and Google’s machine learning algorithm that uses 40+ signals to evaluate an impression. Of course, there are three key steps that outline the entire process (don’t worry we are going to break each one down later):
- Firstly, make sure you align your campaign goal with your business objective. For example, if you wanted to optimize for a specific action on your website (eg. the most expensive tier of your service offering), but did not have enough volume and had to choose an upper funnel proxy metric, custom bidding solves for that. Hence, deciding on a KPI, do not limit yourself because of conversion volume or a single touch-point. Think about your business.
- Create an algorithm and assign a script to it in DV360. The script will contain all of your rules and conditions that would essentially tell DV360 how much an impression is worth to you.
- Once the algorithm is activated, DV360 begins scoring the impressions based on your script. The learning phase can last a few days and when the algorithm is ready, you can assign it as a bidding strategy to your campaign. Bear in mind, the custom bidding algorithms require a 30 day window of data.
What are the main aggregate functions and script structure?
Before diving into the practical examples, you would notice that there are a few functions that repeat quite often. There are three core functions that are at the basis of most custom bidding scripts (unless you are doing custom variables):
sum_aggregate– depending on how many criteria you have, this function will sum the scores up, if they are all return true.max_aggregate– in this scenario, the function will return true only for the criteria that had the highest score or assigned weight.first_match_aggregate– this is a less common function, but returns the assigned value for the first criteria in the array that returns true.
The general structure of a script also looks something like this:
return aggregate_function([
 ([criteria_a, criteria_b], score),

#you have to select what criteria is true and assign a score to it.

 ([criteria_a], score)

#you repeat the same for your second criteria and assign it a different score. This will allow you to provide context for your algorithm on the range of difference between criteria 1 and 2.

])
Practical use cases and script templates (with real examples)
In the next few sub-section, we are going to explore the different type of algorithms you can have within custom bidding. I have tried my best to translate the technical documentation available into a more practical guide with real examples.
Weighted Conversions (Floodlights)
One of the powerful use cases of the custom bidding feature is called “weighted conversions”, which allows an advertiser to optimize towards different conversion activities. Furthermore, you can split a conversion between post-click and post-view, and assign different weights to each one. Let’s put this into practice.
Assume that you are a CPG company that offers product samples on your website. In order for the user to get a sample, you need to fill out a form that has three steps, “Start”, “Complete” and “Approved” (if this is a new user, who hasn’t tried before). Plus, your research team has shared an insights with you that all users that came from a post-click conversion bought your product immediately after. Whereas, the user from a post-view conversion received the sample, but rarely bought the actual product.
The first step is splitting the conversion into “click” and “non click” (post-view). You can replace weight_1 and weight_2 by potentially putting higher emphasis on the “click” conversion.
return max_aggregate([

    ([click, total_conversion_count(Floodlight_ID_1, model_id)>0], weight_1),
    ([not click, total_conversion_count(Floodlight_ID_1, model_id)>0], weight_2),

])
Building on that, it is important to use the max_aggragate function, so the algorithm can score only the conversion with the highest score. Why? If you have any type of funnel-like application, the “Approved” user is also a “Start” and “Complete”, so you want to make the distinction for Google. This is why custom bidding is so powerful!
return max_aggregate([

    ([click, total_conversion_count(Floodlight_ID_1, model_id)>0], 4),
    ([not click, total_conversion_count(Floodlight_ID_1, model_id)>0], 2),

    ([click, total_conversion_count(Floodlight_ID_2, model_id)>0], 12),
    ([not click, total_conversion_count(Floodlight_ID_2, model_id)>0], 6),

    ([click, total_conversion_count(Floodlight_ID_3, model_id)>0], 36),
    ([not click, total_conversion_count(Floodlight_ID_3, model_id)>0], 18)
])
As a side note, you can set model_id to 0 for the time being. Later on we will explore why.
Weighted Conversions (Google Analytics 360 Goals)
Optimizing against Google Analytics goals in DV360 has been a highly anticipated feature for a long time, now that is a reality. Even thought the feature came out in 2020, I don’t think it has gained the popularity it deserves. To me, this is a big deal 🙂
Prerequisite: In order for this to work, you would need to link your Google Analytics 360 account to an active Display and Video 360 advertiser. This article shows exactly how that is done.
For those of you who want to start off easy, you only need to write a single line of code to optimize against a goal. This can be page duration, destination, event actions and pages/screens per session. The only information you would need is the particular View and Goal IDs.
return has_ga_goal(GA View ID, GA Goal ID)If has_ga_goal(GA View ID, GA Goal ID) returns true, it will return 1. If it is false, it will return 0. It is as simple as that and works in an identical fashion to the single floodlight optimization.
Now, let’s imagine you are a car dealership and the users who land on your website can complete one of the following key actions:
- Submit address in branch locator
- Use the “Build & Price” tool to pick and customize a vehicle.
- Book a test drive
All of these actions are tagged with a goal, but also indicate different stage of the customer journey. For example, if a user wants to “Book a test drive”, then he/she is probably super close to buying a car. On the other hand, if the same user completes the “Build & Price” tool then he/she is still in the research phase. Needless to say, these actions have different weights in the customer journey. This is where you can optimize for a combination of goals and assign different weights, as per the below script.
return sum aggregate([

        ([has_ga_goal(GA View ID, GA Goal ID)], ga_goals_count(GA View ID, GA Goal ID)),

        ([has_ga_goal(GA View ID, GA Goal ID)], ga_goals_count(GA View ID, GA Goal ID)*5)

        ([has_ga_goal(GA View ID, GA Goal ID)], ga_goals_count(GA View ID, GA Goal ID)*10)

])
And last but not least, the cousin of the “custom variable”, the goal value. Essentially, the script below optimizes for ROAS. For example, you have an eCommerce website and want to optimize for those customers who have spend more than $1000 dollars, as that perhaps is an indication that they are high value customers. In this case, the script will optimize for those users and return 0 (ignore) the ones that for example have spend only $50.
if ga_goals_count(GA View ID, GA Goal ID)>1000:

 return ga_goals_total_value(GA View ID, GA Goal ID)

else:

 return 0
Custom Floodlight Variables
The custom variable in DV360/CM360, allows an advertiser to pull additional information when a user converts. Mostly commonly, custom variables are used on confirmation pages of travel companies and airlines. This allows them to pass all the valuable data related to a booking (eg. seat type, price, destination and etc.).
However, for the script below, let’s imagine a different scenario. You are a SaaS company that sells business packages. You have a “Basic”, “Medium”, “Elite” and a “Free” version. In this case, you want to put more weight on an impression that is coming from an “Elite” package, as that is your most expensive one. For instance, if you assign a 1 to “Basic” and 10 to “Medium”, then you are essentially saying, Medium is 10 times more valuable to me than “Basic”.
You can also, assign “0” to “Free”, because you don’t want to score clients who are just going for the free package. Hence, this provides an enormous context for Google to look for those users that are most likely to convert based on the business packages you have and NOT valuing them the same; this is what would happen with a “Maximize Conversions” for example, every user will be a conversion and no business package delineation will exist.
_businesspackage = conversion_custom_variable (Floodlight_ID, model_id, u_variable_index)
if _businesspackage == "" or _businesspackage == None:
  return 0
elif _income == "Basic":
  return 1
elif _income == "Medium":
  return 10
elif _income == "Elite":
  return 50
elif _income == "Free":
  return 0
else:
  return 0
In terms of setup, you would need to declare the variable by giving it a name. In our case _businesspackage, then tell Google that is a custom variable by using the function conversion_custom_variable. From there, you would need the following:
- Floodlight_ID – the floodlight is from CM
- model_id – this is your attribution model, if you have setup something custom. If not, then you can leave is to the default “0”
- u_variable_index – this will be the custom variable id in CM
Sales Floodlight Revenue
Like the Google Analytics goal value, the sales floodlight revenue is based on the “Floodlight Sales tag” and can help you optimize against a transaction value. I am not going to spend too much time on it, but the sample script will look like this:
return (total_conversion_value(CM_activity_id, model_id))How to create an algorithm and activate a campaign with custom bidding inside DV360?
In my previous article, How to create a Custom Bidding script in Display and Video 360 (DV360), I covered the technical script building process in detail, so you can take a look at that. The walk-through touches on the script validator, model training and custom bidding limitations. In this section, I want to focus on activating the custom bidding algorithm within a campaign. Here are the highlights:
- Once your script is ready and trained, you can navigate to the DV360 advertiser where you would want to run it. Custom bidding can be used at an insertion order or line item level. If you are running custom bidding for the first time, we will explore how to setup a fair test to evaluate performance accurately.
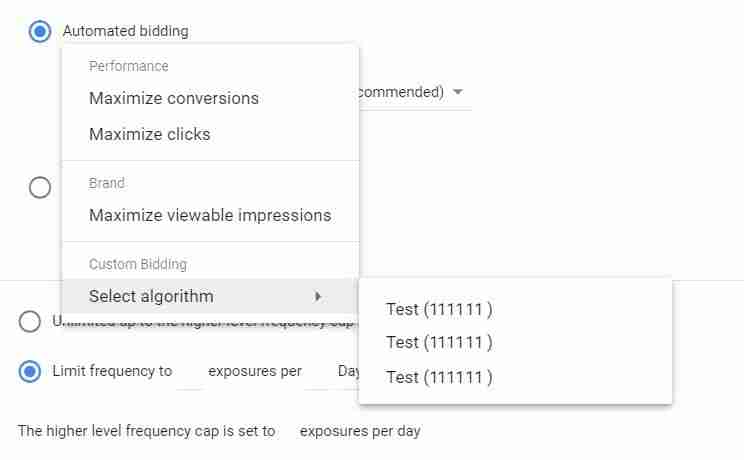
- When you select your algorithm, you can pick either:
- “while prioritizing spending my full budget (recommended)”, which essentially ensures that you spend your daily budget and bid as per the script assigned.
- “while prioritizing hitting a target value cost”, which is similar to a Target CPA. Once you see what your desired impression custom value is and run a few algorithms, you can use this option.
- Avoid making any changes once you have launched the custom bidding algorithm, as that might affect the learning phase negatively.
Below is a quick snip of what the algorithm selection looks like in DV360.
A huge callout! The first week of performance would most likely be poor as that is the time the algorithm is learning. You should see drastic improvements in week 2 and 3.
What is the best way to setup a DV360 Experiment to test your Custom Bidding algorithm?
If you are running custom bidding for the first time or you are trying to compare different types of algorithms, creating a DV360 Experiment is a must. A controlled experiment allows you to split your cookies (exposed vs control users) into mutually exclusive groups, which prevents test contamination. Here is how this works:
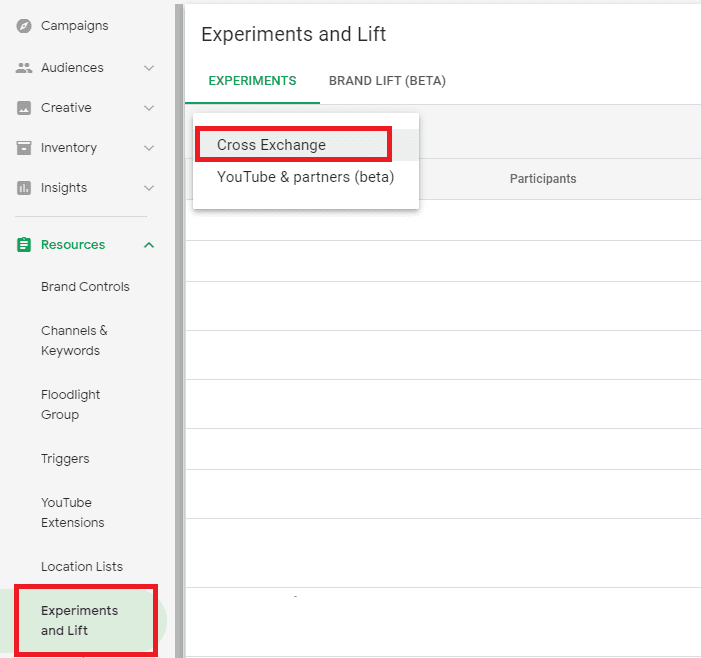
Once you expand the “Resources” menu in your DV360 console (make sure you select an advertiser first), you will be able to see “Experiments and Lift”. Proceed to creating a new experiment and select “Cross Exchange”, this is the option for Display. If you are running custom bidding with partner video, then you would have to select “YouTube & partner”.
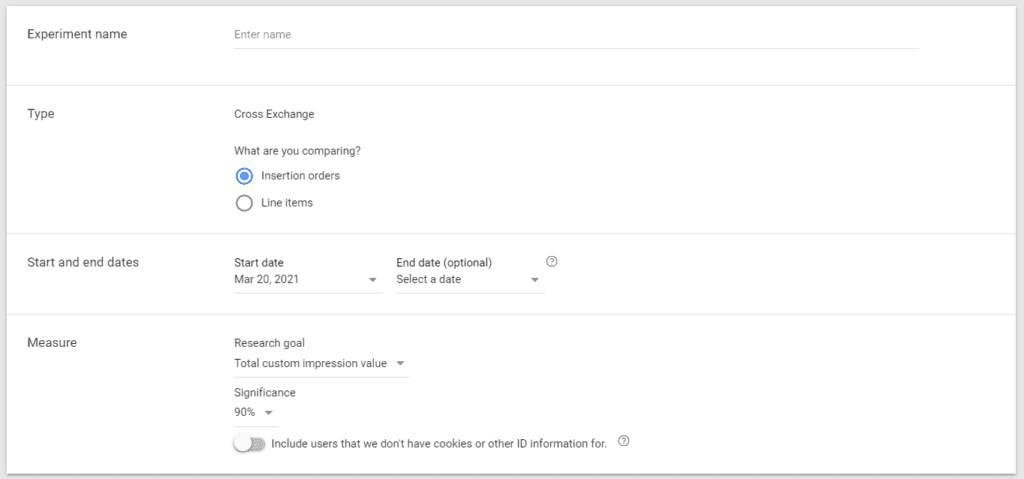
The first part of the setup is fairly straightforward, but there are a few tricks. You would have to pick whether you are going to compare “Line Item vs Line Item” or “Insertion Order vs Insertion Order”. Generally, it does not matter which option you pick, but the most important aspect is to test only one variable at a time. Therefore, you would need to have the budget, creative, duration, targeting exactly the same between the control and exposed groups.
When it comes to the research goal, you would have to select “Total Custom Impression Value”. The custom bidding algorithm optimizes for ROAS as defined by your Impression Custom Value /
Cost. If your exposed’s Impression Custom Value / Cost exceeded that of your control’s during the experiment, custom bidding has successfully outperformed your control bid strategy.
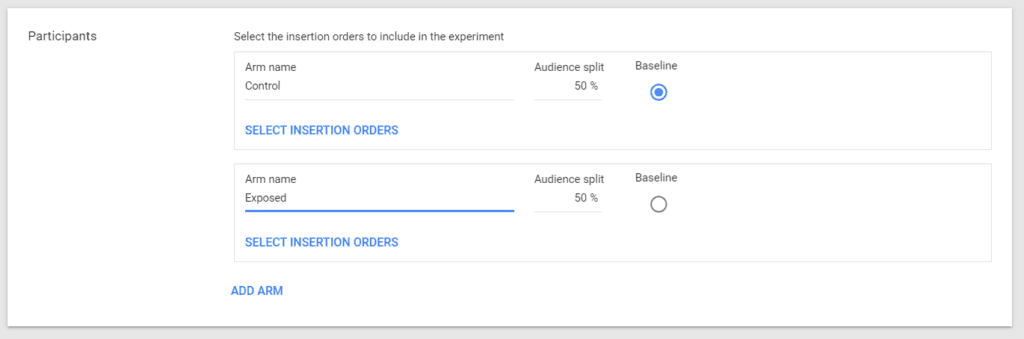
Lastly, whether you have chosen IOs or LIs, ensure you name your two arms of the experiment as something recognizable – Control and Exposed are standard. The other super important aspect is to have the audience split proportionally between each arm. If you are testing more than 2 algorithms, then you might consider splitting 33/33/33.
How to correctly measure and report on your Custom Bidding algorithm’s success?
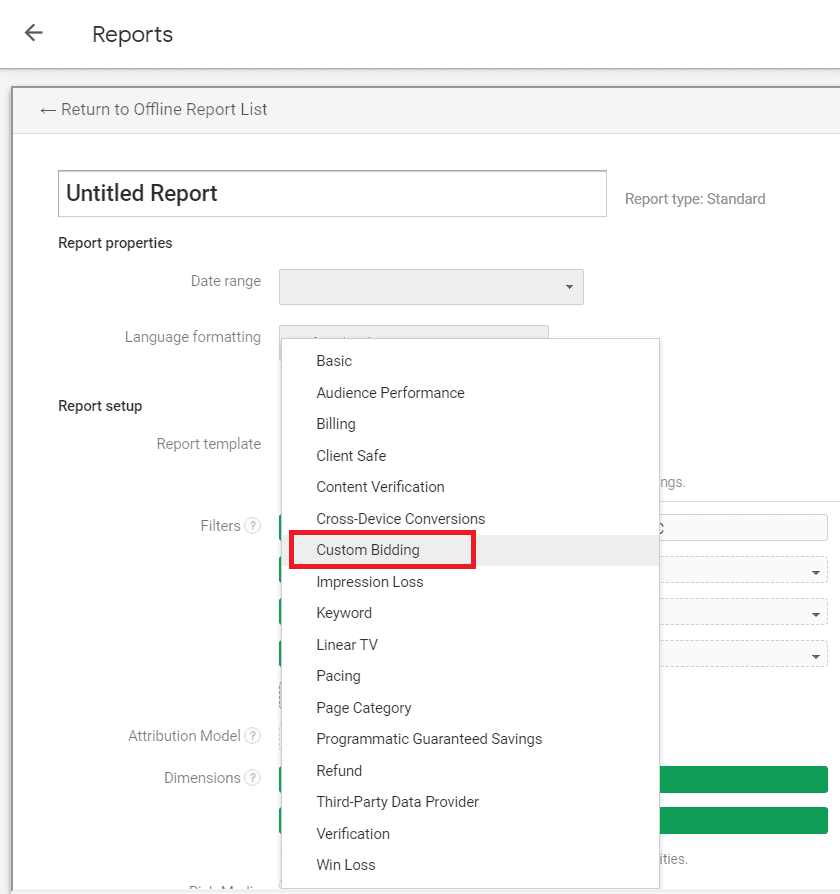
The measurement for custom bidding is a bit different than what you you would normally do for a regular campaign. You can find the report template by navigating to Insights -> Reports -> Offline Reporting -> New Offline Report -> Report template (Custom Bidding)
Once you select the custom bidding reporting template, you would have several brand new metrics. Here are the ones that matter the most in my opinion:
- Impressions with custom value
- These are impressions that are scored by your script; this includes impression that scored “0” as well. If this number is too low, this is an indication that your script might not have enough historical data available.
- Impressions with positive custom value
- This metric include all impressions scored with a >0 value. This is the cleanest representation of the activity in your script rules.
- Total impression custom value
- This is the sum of all impression custom values
- Impression Custom Value / Cost
- This is the formula (Total impression custom value) / (Estimated total cost). This is the key metric that determines how successful your custom bidding algorithm is going to be. The higher the value the better.
Final Thoughts
The media buying space is evolving and as such, techniques like automated bidding are going to become even more widely used. Indeed, DV360 and the Google Marketing Platform (GMP) are pioneers in the space. However, it is expected that other ad servings and demand-side platforms (DPSs) such as TradeDesk, StackAdapt, TubeMogul and App Nexus are going to catch up. All in all, media buying, in particular, display advertising space is entering an interesting stage.
Work with Lachezar
I hope this was helpful! If you have any questions, feel free to DM me on LinkedIn or subscribe to my newsletter for more updates.
3 comments
For the custom variable example should the first variable be _income? I tried something similar and got an error unless the variable at the top and the variables in the if elif statements were the same. I don’t see _income defined anywhere. Thanks
Hi Chris,
You need to define _income variable.
Could be something like this – _income = conversion_custom_variable(DCM Activity ID, Attribution Model ID, Custom Variable Index), where you need to replace inputs of a function with your values. The function returns – The string value of the custom variable for the latest attributed conversion for the impression. Otherwise returns “None” (if there is no conversion / value is not set). Use your own model, or enter 0 for the model ID to use last-touch attribution.
Hello friend, excellent information on custom bidding, I am putting into action some examples and I wanted to consult you regarding the case: Custom Floodlight Variables, where I think I understand almost all the script and had doubts about the variable “_income”, is it defined previously? Is it related to the content of “u_variable_index”? If you could explain a little more that script I will appreciate it. Greetings!
Comments are closed.